Exact Metrology Helps Pattern-Maker Ensure Greater Accuracy
Located in Butler, Wisconsin, Accurate Pattern Inc. specializes in wood, metal, and plastic patterns, tools, fixtures, gages, prototypes, and models since 1985. Technologies and services include CAD design, manual and CNC machining, wood and metalworking, painting and welding, plastic fabrication, and form services such as design, engineering, and production job shops.
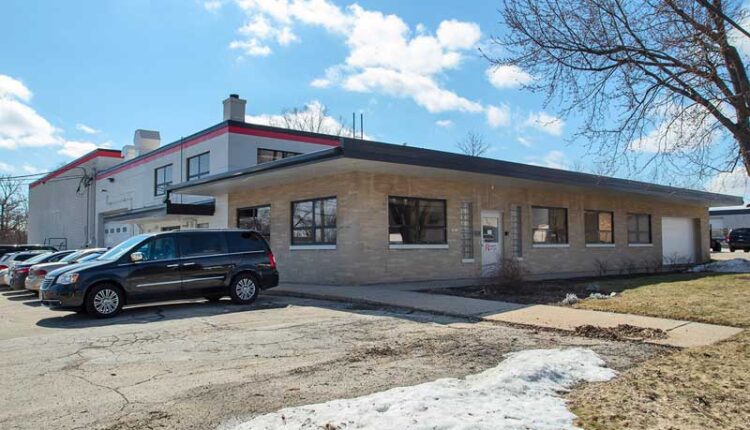
Originally known as Accurate Pattern & Model Inc., it was founded by brothers Bruce and Brian Williams in February 1985. Accurate Pattern supplied its first customers with precision patterns for urethane molded parts. In 1986, the company was incorporated and Bruce became President. In November 2007, Accurate Pattern Inc. moved to its current location, a plant featuring 19,000 square feet of shop/office space and 5,000 of the mezzanine. Bruce has used Exact Metrology products throughout the years to ensure accurate, reliable results.

Accurate Pattern Building
Bruce met Dean Solberg, Exact Metrology co-President when he was looking to buy an Elm CMM/ layout machine with PC-DMIS software. Dean was in contact with a sales representative at Elm Systems and helped Accurate Pattern Inc. by setting them up with the right machine, configuration, and software. Bruce added, “We only entered the quality fixture market because of the inspection capabilities Dean helped us obtain.” In 2014, he helped Bruce by suggesting he purchase a Wenzel machine for coordinate measuring with CNC.
Subsequently, Bruce purchased a Wenzel CNC CMM with Open DMIS software. The following year, Bruce attended an Exact Metrology Open House and saw the Romer Absolute Arm in action. He purchased the Hexagon Absolute Arm 7-Axis, making it the company’s second CMM system that ensures precision and meets quality certification requirements. Over the last year, Accurate Pattern Inc. worked with Exact Metrology to change the Open DMIS software on Wenzel to PolyWorks|Inspector™.
The Elm machine added great capabilities to pattern and fixture measurement. Before that, the company had only been able to use height gages, calipers and they weren’t able to certify their work. The Elm allowed Accurate Pattern Inc. to start quality fixture building and greatly improved accuracy in all their work. According to Bruce, “The Romer Arm with PolyWorks|Inspector™ was a game-changer for inspecting patterns and molds 100% to reference CAD data.” Previously, personnel was only able to perform spot checks with hand tools.
This was both time–consuming and inefficient. Now, the large reach of the model (~13’ diameter) allows personnel to check patterns like truck hoods, wind turbine blades, and boat hulls in a single setup. If necessary, users can shift the scanner on its portable stand, and the software stitches the scan data together. According to Bruce, “The Romer arm’s .003” accuracy confirms the quality our customers need.” Switching from Elm to Wenzel CNC CMM increased checking accuracy and efficiency ten-fold.
Previously, they were only able to guarantee +/- 004” (.1 mm). Now, measurement accuracy is better than .0003” (.006 mm). With support from Exact Metrology, the company added PolyWorks|Inspector™ software to their Wenzel DCC CMM machine. Now, they can certify inspect quality fixtures in half the time it took with their old software.

Romer Absolute Arm
Daniel Jones, the Model Shop Manager at the company, commends Exact Metrology for the attention and help they’ve received. He said that Exact does an excellent job with its customers by having workshops and Open Houses to teach and train them in new areas of development as well as how to use hardware and software in more productive ways. Furthermore, Jones appreciated how quickly Exact Metrology responded to their requests, as they have an office in Brookfield, Wisconsin. He said, “On multiple occasions, when we were having difficulties or when problems arose they were able to be here that same day to help resolve the issue or direct us to the right solution. It is good to know that we have an industry partner that is ready and able to provide the service and expertise that we needed.”
Thanks to the collaboration with Exact Metrology, Accurate Pattern Inc. was able to complete two different projects. These involved first article inspections, quick changes on a car model, and modified a cast aluminum tool.
The Hexagon Romer Absolute Arm was used to complete the first article inspections for fiberglass and vacuum formed parts. Romer was also used when the pattern on a model car needed changing. Thus, the scanner was used to align on a 5-axis router and recut within .005.” Then, while painting, personnel laser inspected so that they know how much to hand sand and still maintain accuracy. Recently, a cast aluminum tool needed to be modified. In order to know wall thickness and the position of water lines, the tool was laser scanned to help compare the results to the CAD data and machine within the wall and not damage water lines.

Scanning the mold of a car
Using Romer has greatly helped the company. Jones commented, “We have been able to greatly reduce our customer nonconformances by inspecting our patterns in-house. This has gained us greater confidence from our customers and has helped us produce more accurate patterns. We have also been able to re-machine jobs with more precision thanks to the capabilities of scanning the job in position on the machine.”
Reverse engineering is made easy with the company’s digitizing service. Accurate Pattern Inc. digitizes existing shapes to CAD format for redesign and reproduction. This enables rapid design changes, scaling, or mirror imaging. The company builds patterns or tools to produce vacuum formed, composite, foam, or cast parts. They typically run wood, metal, steel, and tooling boards.

close-up scan
Accurate Pattern Inc. serves many different industries including aerospace, automotive, consumer, energy, lawn and garden, marine, foundry, medical, and equipment. Additional industries served are military, point of purchase, pump, and valve, transportation, fiberglass, injection molding, laminating/composites, metal forming, and vacuum.
Bruce looks forward to the future of his company, stating, “I want to do verification on the machine, have handheld scanning for on-site digitizing and have cloud-based CAD, inspection and reverse engineering software.” He also plans on using a large format metrology scanner. The company will receive ISO 9001: 2015 certification this year. Having always stressed quality, Accurate Pattern Inc. will soon have a system to assure customers that all their expectations will be fulfilled.
He concluded, “We would not be the company we are without the likes of Dean and the crew at Exact. They have given us a great competitive advantage in the world of metrology that applies to all our patterns, molds, fixtures, and tools.”

Data from the scan
This content was originally published on the Exact Metrology website.

